ASP.NET'te ImageResizer.net ile resim küçültme ve MyImage sınıfım ile kullanımı
Web sitelerinizde resim küçültme işini ImageResizer.net resim kütüphanesi ile kolayca nasıl yapabileceğinizi bu yazıda görebilirsiniz.
ImageResizer.net, web sitelerinizde kullandığınız resimleri, size neredeyse hiç iş düşürmeden küçülten (isterseniz büyüten de) bir resim kütüphanesidir.
Bu yazıda, ImageResizer.net'i web sitenize yüklemeyi, web.config'te gerekli ayarları yapmayı ve son olarak da benim yazdığım MyImage sınıfı ile küçültülen resimlerinizi web sayfalarınızda kolayca kullanmayı öğrenebileceksiniz.
İlk iş olarak ImageResizer.net'i sistemimize yükleyelim.
2 farklı yoldan yapabilirsiniz:
1. Visual Studio'da web projeniz açıkken;
VS2010 için; Tools -> NuGet Package Manager -> Package Manager Console,
VS2012 için; Tools -> Library Package Manager -> Package Manager Console
seçeneğinden Package Manager Console'una girip
PM> Install-Package ImageResizer
yazıp entera basınız.
2. http://imageresizing.net/download adresinden ImageResizer binary sini indirip web sitenize refere ediniz.
İndirme ve siteye refere işi bitince, bu yazıda ağırlıklı olarak kullanacağımız, DiskCache pluginini kuralım:
Package Manager Console'da
Install-Package ImageResizer.Plugins.DiskCache
yazıp entera basın ya da download linkinden indirdiğiniz dosya içerisindeki plugin klasörü altındaki DiskCache projesini açıp derleyip oluşan dll i web sitenize refere edin.
Bu iki işlemi gerçekleştirdiğinizde projenizin son hali şu şekilde olmalıdır:
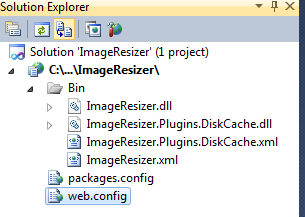
Bu işlemi doğru bir şekilde yaptıysanız, sırada web.config ayarları var.
web.config dosyanızı şu şekilde güncelleyin:
(kırmızı alanlara dikkat!)
<?xml version="1.0" encoding="utf-8"?>
<configuration>
  <configSections>
    ....
    <section name="resizer" type="ImageResizer.ResizerSection" requirePermission="false" />
    ....
  </configSections>
  <resizer>
    <diskCache dir="~/upload/_imagecache" autoClean="true" hashModifiedDate="true" enabled="true" subfolders="32" cacheAccessTimeout="15000" asyncWrites="false" asyncBufferSize="10485760" />
    <cleanupStrategy startupDelay="00:05" minDelay="00:00:20" maxDelay="00:05" optimalWorkSegmentLength="00:00:04" targetItemsPerFolder="400" maximumItemsPerFolder="1000" avoidRemovalIfCreatedWithin="24:00" avoidRemovalIfUsedWithin="4.00:00" prohibitRemovalIfUsedWithin="00:05" prohibitRemovalIfCreatedWithin="00:10" />
    <clientcache minutes="14400" />
    <plugins>
      <add name="DiskCache" />
    </plugins>
  </resizer>
  <system.web>
    <compilation debug="false" targetFramework="4.0" />
    <httpModules>
      ....
      <add name="ImageResizingModule" type="ImageResizer.InterceptModule" />
      ...
    </httpModules>
  </system.web>
  <system.webServer>
    <modules runAllManagedModulesForAllRequests="false">
      ...
      <add name="ImageResizingModule" type="ImageResizer.InterceptModule" />
      ...
    </modules>
  </system.webServer>
</configuration>
Burada DickCache plugini için özelleştirmeleri görüyorsunuz. Kendinize göre özelleştirebilir ya da daha fazla detay için bu sayfaya göz atabilirsiniz.
Not: DiskCache pluginin düzgün çalışabilmesi için /upload/_imagecache klasörüne yazma izni vermelisiniz.
Artık bir deneme yapabiliriz, bakalım herşeyi düzgün yapmış mıyız?
Projenize bir adet web sayfası ve bir adet resim ekleyin.
Ardından şunu sayfanıza yapıştırın:
...
<form id="form1" runat="server">
<div>
    <img src="images/goztepe.jpg" />
    <img src="images/goztepe.jpg?width=200&height=200&mode=stretch" />
</div>
</form>
...
Örnek resim olarak bu adresteki resmi kullandım. Siz istediğiniz resimle bu testi gerçekleştirebilirsiniz.
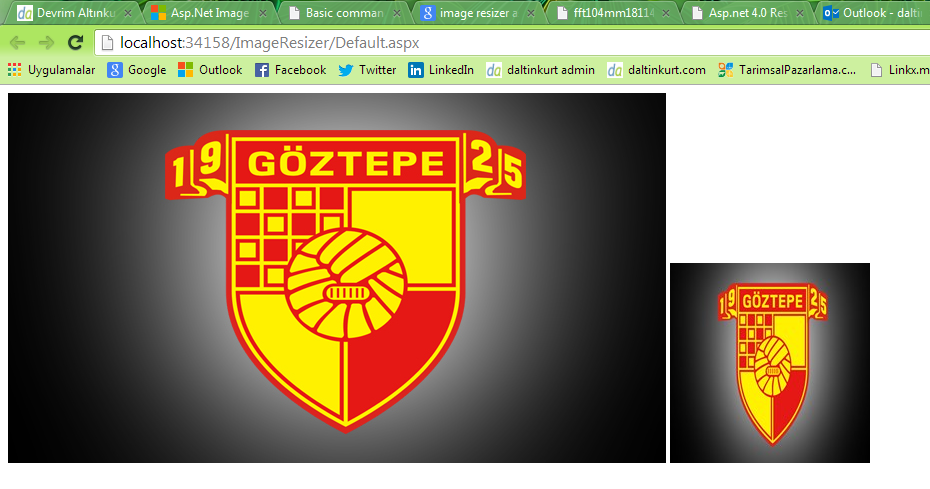
Herşeyi düzgün yaptıysak karşımıza şu şekilde bir sayfa gelmelidir:
İlk resim, resmin orjinal halini gösteriyor. İkinci resim de bizim parametre ile belirlediğimiz ölçülerdeki resmi gösteriyor.
Farkettiyseniz, yapmamız gereken tek şey resim yolunun sonuna parametreler eklemek. Parametreler ile ilgili detay bilgiyi bu sayfadan bulabilirsiniz.
ImageResizer.net'in resmi küçültürken, resmi görüntülediğimiz img tagının width / height attributeleri ile değil de ciddi ciddi yeni bir resim oluşturarak işlemi gerçekleştirdiğini kanıtlayalım:
Bunun için bu adresteki Image Properties Context Menu eklentisini kullanıyorum:
Bu ilk resme ait:
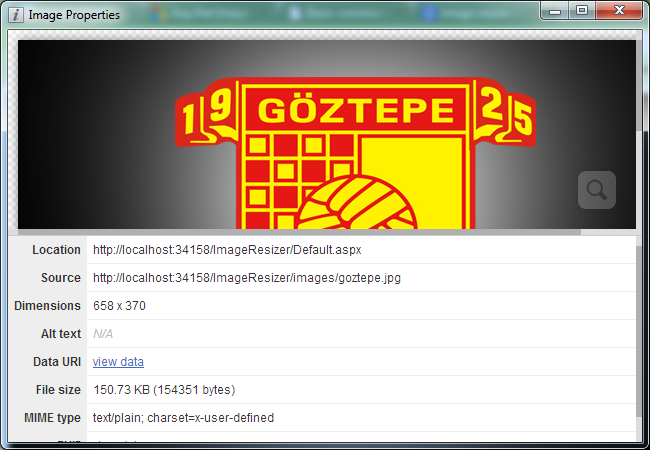
Bu da ikinci resme ait:
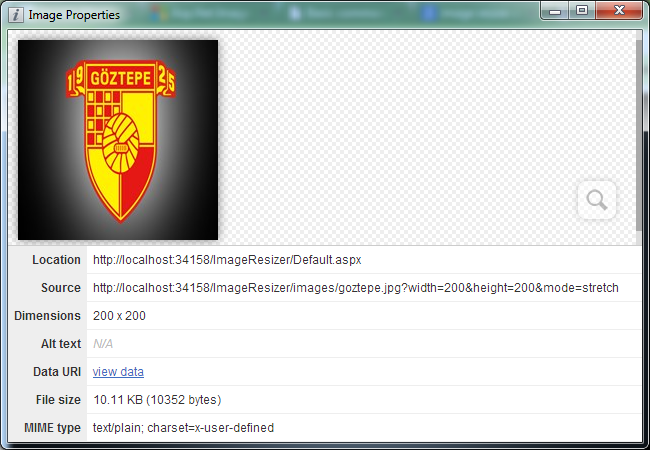
İlk resim, serverdan 150KB çekilmesine, ikinci resim ise sadece 10KB çekilmesine sebep olmuş.
İpucu: Sayfaya refresh attığınızda ya da aynı sayfayı tekrar ziyaret ettiğiniz ImageResizer, aynı resim için tekrar küçültme işlemi gerçekleştirmez. Önceden üzerinde işlem yaptığı resimleri web sitenizin /upload/_imagecache klasörü altına (bkz: web.config ayarları) atar ve bir sonraki çağırışında direkt bu dosyayı kullanır. Performans açısından çok iyi bir hareket!!!
Şimdi gelelim bir başka can alıcı noktaya. Ben son zamanlarda yazdığım tüm web sitelerinde MyImage adını verdiğim class ı kullanıyorum. Bu class, Image classından türeyen bir class ve dolayısıyla Image nesnesi ile nasıl çalışıyorsanız aynı şekilde çalışmaya devam edebiliyorsunuz. Ben sadece ImageResizer ı projelerimde kullanabilmek için Property ler aracılığı ile resim parametrelerini ayarlıyorum.
MyImage classım şu şekilde:
using System;
using System.Web;
using System.Web.UI.WebControls;

namespace DevrimAltinkurt.Kontroller
{
    public class MyImage : Image
    {
        private string emptyImageUrl = "";
        private int maxWidth = 0;
        private int maxHeight = 0;
        private bool thumbnail = false;
        private bool scaled = true;
        private int quality = 75;

        public int Quality
        {
            get { return quality; }
            set { quality = value; }
        }

        public bool Scaled
        {
            get { return scaled; }
            set { scaled = value; }
        }

        public bool Thumbnail
        {
            get { return thumbnail; }
            set { thumbnail = value; }
        }

        public int MaxHeight
        {
            get { return maxHeight; }
            set { maxHeight = value; }
        }

        public int MaxWidth
        {
            get { return maxWidth; }
            set { maxWidth = value; }
        }

        public string EmptyImageUrl
        {
            get
            {
                if (ViewState["img" + this.UniqueID + "emptyImageUrl"] != null)
                    emptyImageUrl = ViewState["img" + this.UniqueID + "emptyImageUrl"].ToString();
                return emptyImageUrl;
            }
            set
            {
                if (!string.IsNullOrEmpty(value))
                {
                    emptyImageUrl = value;
                    ViewState["img" + this.UniqueID + "emptyImageUrl"] = emptyImageUrl;
                }
            }
        }

        public MyImage()
        {
            MaxWidth = 0;
            MaxHeight = 0;
            EmptyImageUrl = "";
        }

        protected override void Render(System.Web.UI.HtmlTextWriter writer)
        {
            if (string.IsNullOrEmpty(this.ImageUrl))
                this.ImageUrl = EmptyImageUrl;

            bool thumb = false;
            if (!thumbnail)
            {
                thumbnail = true;
            }
            else
            {
                thumb = true;
                // URL kontrolü yapabilirsiniz
                //if (!HttpContext.Current.Request.IsLocal)
                //    if (this.ImageUrl.StartsWith("http://www.daltinkurt.com") ||
                //       this.ImageUrl.StartsWith("https://www.daltinkurt.com"))
                //        thumb = false;
                ////if (!thumb)
                ////{
                ////    if (this.ImageUrl.StartsWith("http://") ||
                ////   this.ImageUrl.StartsWith("https://"))
                ////        thumb = true;
                ////}
            }
            if (thumb)
            {
                //ImageBoyutlandir();
                //if (this.Attributes["width"] == null)
                //    if (this.Width.Value > 0) this.Attributes.Add("width", this.Width.Value.ToString() + "px");
                //if (this.Attributes["height"] == null)
                //    if (this.Height.Value > 0) this.Attributes.Add("height", this.Height.Value.ToString() + "px");
                this.Width = this.MaxWidth;
                this.Height = this.MaxHeight;
                this.Attributes["weight"] = this.Width.Value.ToString() + "px";
                this.Attributes["height"] = this.Height.Value.ToString() + "px";
                this.Style["weight"] = this.Width.Value.ToString() + "px";
                this.Style["height"] = this.Height.Value.ToString() + "px";
            }
            else
            {
                // &process=no ???
                if (scaled)
                {
                    this.ImageUrl = string.Format("{0}?maxwidth={1}&maxheight={2}&mode=max&quality={3}&cache=always",
                                   this.ImageUrl, this.maxWidth, this.maxHeight,
                                   this.quality);
                }
                else
                {
                    this.ImageUrl = string.Format("{0}?width={1}&height={2}&mode=stretch&quality={3}&cache=always&scale=both",
                                   this.ImageUrl, this.maxWidth, this.maxHeight,
                                   this.quality);
                }
            }

            base.Render(writer);
        }

        private void ImageBoyutlandir()
        {
            //if (this.Width.Value == 0 || this.Height.Value == 0) return;
            //try
            //{
            using (System.Drawing.Image img = GetImage())
            {
                if (img != null)
                {
                    if (scaled)
                    {
                        if (img.Width > MaxWidth || img.Height > MaxHeight)
                        {
                            double widthRatio = 1.0;
                            if ((int)MaxWidth > 0)
                                widthRatio = (double)img.Width / (double)MaxWidth;

                            double heightRatio = 1.0;
                            if ((int)MaxHeight > 0)
                                heightRatio = (double)img.Height / (double)MaxHeight;

                            double ratio = Math.Max(widthRatio, heightRatio);
                            int newWidth = (int)(img.Width / ratio);
                            int newHeight = (int)(img.Height / ratio);

                            this.Width = Unit.Pixel(newWidth);
                            this.Height = Unit.Pixel(newHeight);
                        }
                    }
                    else
                    {
                        if (this.Width.Value == 0)
                            this.Width = (maxWidth == 0) ? img.Width : maxWidth;

                        if (this.Height.Value == 0)
                            this.Height = (maxHeight == 0) ? img.Height : maxHeight;
                        //if (this.Width.Value == 0) this.Width = img.Width;
                        //if (this.Height.Value == 0) this.Height = img.Height;
                    }
                }
            }
            //}
            //catch (Exception)
            //{ }
        }

        private System.Drawing.Image GetImage()
        {
            if (string.IsNullOrEmpty(ImageUrl.Trim())) return null;

            try
            {
                if (this.ImageUrl.StartsWith("http://") || this.ImageUrl.StartsWith("https://"))
                {
                    return null;
                    //WebRequest req = WebRequest.Create(this.ImageUrl);
                    //WebResponse response = req.GetResponse();
                    //Stream stream = response.GetResponseStream();
                    //return System.Drawing.Image.FromStream(stream);
                }
                else
                    return System.Drawing.Image.FromFile(HttpContext.Current.Server.MapPath(this.ImageUrl));
            }
            catch (Exception)
            {
                return null;
            }
        }
    }
}
Öncelikle DevrimAltinkurt.Kontroller adında bir Class Library oluşturdum, içerisine bu class ı ekledim. Derlemede hata vermemesi için bu library'ye System.Web ve System.Drawing dll lerini refere ettim. Derleme işleminden sonra Class Library'yi web siteme refere ettim.
(Classın DevrimAltinkurt.Kontroller namespace i altında olduğunu da hatırlatmak isterim.)
Peki bu classı web sayfalarımızda nasıl kullanacağız, şimdi de buna bir göz atalım.
Sayfamızın üst tarafına aşağıdaki kodu ekleyerek, MyImage classımızı kullanılabilir hale getirelim:
<%@ Register Assembly="DevrimAltinkurt.Kontroller" Namespace="DevrimAltinkurt.Kontroller"
    TagPrefix="da" %>
Her sayfa için ayrı ayrı yapacağımıza, dilerseniz web.config'te bu kütüphaneyi tanımlayalım, böylece tüm sayfalarımızda kullanıma hazır hale gelsin:
<system.web>
  ...
  <pages>
    <controls>
      ...
      <add tagPrefix="da" namespace="DevrimAltinkurt.Kontroller" assembly="DevrimAltinkurt.Kontroller" />
      ...
    </controls>
  </pages>
  ...
</system.web>
Şimdi sayfalarımızda kullanmaya başlayabiliriz.
Standart bir resim olarak kullanalım:
<img src="images/goztepe.jpg?width=200&height=200&mode=stretch" />
Bu da server bazlı:
<da:MyImage ID="img" runat="server" ImageUrl="images/goztepe.jpg" MaxHeight="200"
    MaxWidth="200" Thumbnail="false" Scaled="true" Quality="90" />
Code Behind'ta kullanalım:
aspx:
<da:MyImage ID="img2" runat="server" />
aspx.cs:
img2.ImageUrl = "images/goztepe.jpg";
img2.MaxHeight = 200;
img2.MaxWidth = 200;

img2.Quality = 85;
img2.Thumbnail = false;
img2.Scaled = true;
DataBind ile kullanalım:
aspx:
<asp:Repeater ID="rpt" runat="server">
    <ItemTemplate>
        <da:MyImage ID="img" runat="server" ImageUrl='<%#Eval("Resim") %>' MaxHeight="200"
            MaxWidth="200" Quality="75" Thumbnail="false" Scaled="true" />
    </ItemTemplate>
</asp:Repeater>
aspx.cs:
rpt.DataSource = BilgileriGetir();
rpt.DataBind();
Dediğim gibi, kullanımı standart bir Image kontrolünden farklı değil.
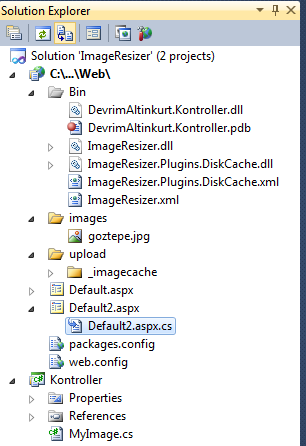
Herşeyi düzgün yaptıysak Solution Explorer''imiz şu şekilde olmalıdır:
Proje dosyalarını indirmek için buraya tıklayabilirsiniz.
***** ------ *****
BONUS BİLGİ:
ImageResizer.net ile çalıştığınızda localhostta kolay kolay sorun yaşamazsınız.
Ancak, serveriniza dosyaları gönderdiğinizde, web sitenizin Application Pool'unun Integrated olmasına dikkat edin.
Eğer Application Pool'u Integrated yapamıyorsanız, (Yani Classic ise) her bir resim linkini şu şekilde güncellemelisiniz:
<img src="images/goztepe.jpg.ashx?width=200&height=200&mode=stretch" />
Diğer tüm kullanımlarda da aynı konu geçerlidir.
Yani resim dosyasının uzantısı dahil adının sonuna .ashx eklemelisiniz.
***** ------ *****
Daha detaylı bilgi için ImageResizer.net sitesini detaylı bir şekilde incelemenizi tavsiye ederim.
Bir yazının daha sonuna geldik, herkese kolay gelsin diyor, sevgi ve saygılarımı iletiyorum. :)
#ImageResizer #ImageResizer-net #MyImage #resim-küçültme #asp-net-resim-işleme #GÖZGÖZGÖZTEPE

